jr90,
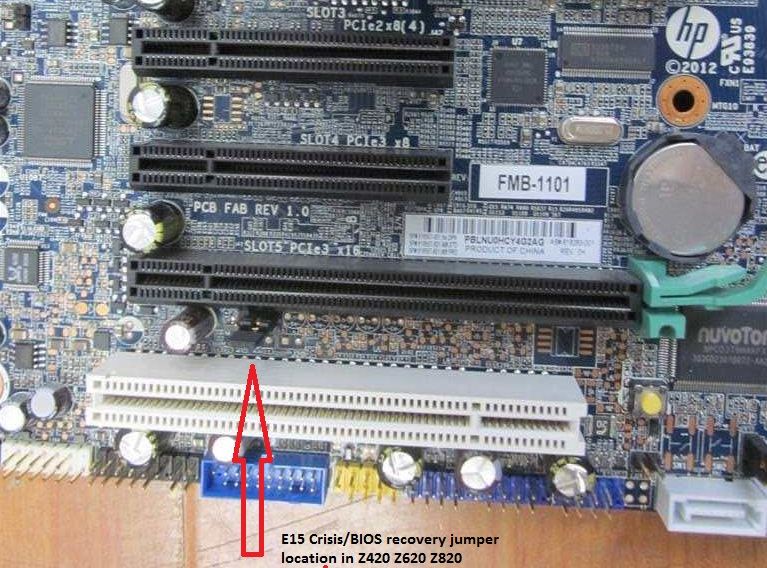
The crisis recovery jumper in the z420 and z620 is located just under the PCI slot on the left side.
Here is a copy of the instructions for use of the crisis recovery jumper:
- In the ZX20 workstations there is a motherboard header, E15, incompletely documented in the Technical and service manual, which can be used to force load of a BIOS .bin file from a USB drive into the motherboard. The position of this 3-pin jumper is partially documented in the technical manual, but the position for the Z420/Z620 virtually identical motherboards is the same as its position on the Z820 motherboard. The Z220 SFF and CMT motherboards have two different positions, which are documented in the manual. There is a big difference between a restart and a cold boot (from power fully off). You must follow the instructions below exactly:
- Power off the workstation and unplug the power cord.
- CORRECTED: Change the jumper position from bridging pins 2-3 (the default condition) to bridging pins 1-2 (the Crisis Recovery position). In the Z420/Z620/Z820 the E15 motherboard header is between the bottom PCI white connector and the next up PCIe black connector. Pin 1 is the far left (towards the workstation's backplane).
- Have a non-NTFS formatted small USB2 drive with the target BIOS .bin file on it, at the top level of the drive, and plug that in to the TOP FRONT USB2 port of the workstation. You could also use a rear USB2 port. Do not use a USB3 port. For the current 4/18 BIOS for the Z420/Z620 version 1 and 2 workstations the BIOS is 3.92, and the .bin file you would have on the thumb drive should be named J61_0392.bin. This can be harvested from the BIOS SoftPaq by auto-unpacking it and going into the SWSetup folder that creates on the root level of C drive, and then going into the source SP84163 folder that is created in SWSetup, and go into the DOS folder that is in there, and copy out that .bin file. You can turn off hiding of extensions of known file type in the Folder view tab control panel to make this easier to find (I keep that setting unchecked always).
- Plug in power cord, power up, and wait.... you should see it blink the USB stick on, and then 7 red lights/beeps from the workstation. NOW wait.... the workstation will auto-reboot, DON'T TOUCH ANYTHING!
- It will restart and you will get blinking USB Stick, and red lights flashing (but this time 8) and then a few seconds later the workstation's lights will go blue and the BIOS will come on. DONT TOUCH YET!
- The workstation will restart again, and the BIOS screen will start, NOW PULL THE USB STICK OUT, and you will see BIOS firmware flash itself.
- The workstation will now auto-restart, and flash 9 times and then fully auto-shut itself off.
- Unplug the power cord, and don’t forget to set the recovery jumper back to its default position (bridging pins 2-3). That is, shift it back to the far right on the pins, where you found it before starting the process.
- Plug back in the power cord, power up, and restore any settings you had in the BIOS, and BIOS should be back to working properly.
Again, the number of beeps likely varies with the particular problem(s) that this advanced firmware mechanism encounters, as it did in my case. This is a last ditch effort procedure so I had no hesitation to keep experimenting until I succeeded.
Here is a picture and an engineering display of the crisis recovery jumper present on all Z420/Z620 motherboards:

